Monday, October 31, 2011

How to create a CAS Array on Exchange 2010

The steps to configure CAS array are as follows:
1.       Create a CAS Array
2.       Point the Exchange databases to CAS Array
3.       Add a DNS host record in the DNS to point to CAS Array Virtual IP

1.       To create a CAS Array, logon to one of the exchange 2010 server and open the exchange management Powershell:
The following command helps to create a CAS Array:
New –ClientAccessArray –Name “ Test Array” –Fqdn “outlook.test.com” site “testsite”
2.       To map the mailbox databases to the CAS array

Set-Mailboxdatabase      DB01      –RpcClientAccessServer        “outlook.test.com”

3.       Go to the DNS server, go to specific zone and add a host record
Outlook                      192.168.10.5

Backup Exec 2010 R3 Restore process Fails with the error

Backup exec cannot establish a trust relationship with the remote agent because an ssl connection cannot be setup
Final error: 0xe0009b90 - Backup Exec cannot establish a trust relationship with the remote agent because an SSL connection cannot be set up.  You can attempt to resolve this issue by re-establishing the trust relationship between the media server and the remote agent.
Final error category: Security Errors

Solution:


Logon on the server which is having issues,
Open the backup exec Remote Agent Console and then click on Security tab
There will be certificate issued. Click on “Change settings” on that window. The window goes off and pop up again.
Now again go to security tab and remove the certificate listed.
Click on Ok and try the restore process again.

Wednesday, October 12, 2011

Important Exchange PowerShell Commands

Without knowing Exchange PowerShell commands it is quite difficult to administer Exchange. So following are the few important PowerShell commands.
To start with I will add few but will be adding many more commands in coming days.

About DAG:
  • How to view the information about DAG including the names of the servers in DAG, current active manger and witness directory:
            Get-DatabaseAvailabilityGroup  –Identity   “<DAGname>”   -status  |  Format-List
  • Remember that dismounting an active database is not a failover.
  • How to know if the active database and passive database are replicated properly or not and how to check the status of the static snapshot
            Get-MailboxDatabaseCopyStatus   -Identity  <Mailboxname> (not the server  name)
About CAS Array: 
  • Find the name of the CAS Array/Server name specific to a Mailbox
            Get-mailboxdatabase      <databasename>     |    fl     rpcclientaccessserver
  • Creating a CAS Array:
            New-ClientAccessArray –Name ‘<array name>’ -FQDN “<CasArrayName> ” -Site ‘<sitename>’
  • Setting the mailbox to a CAS Array
            Set-Mailboxdatabase -Identity ‘<databasename>’ -RPCClientAccessServer ‘<CASArrayname>’

  • Finding all the CAS arrays in Exchange organization
            Get-ClientAccessArray
About HT:
  • Find all the exchange servers and their Sites information
            Get-ExchangeServer | Select  Name,  Site

Symantec Backup Exec 201 R3 - Error when status as device paused

Symantec backup exec 2010 R3 backup job may show the status as Device Paused and when cancelled the job, it comes up with an error
Even after rerun the job, you may still get the same error.
It happens when the server is offline but it doesn’t show the server as offline in Devices tab.
To resolve the issue, reboot the backup exec services and try rerunning the job. Mostly the backup should run fine.


Tuesday, October 11, 2011

Configuring Static Ports on Exchange SP1 CAS Servers

Before we start with creating Virtual services, it is advised to configure static ports on exchange 2010 cas servers.
Here I am going to explain how you can do on Exchange 2010 SP1.
Note: The following registry changes need to be done on all of the CAS servers. Once changes are made, restart the RPC Client Access Service for the changes to be applied.
  • I am going to use 55000 for Exchange RPC and 55001 for Exchange Address Book. It is recommended to use the same static port on all the servers with in the AD Site.

Exchange 2010 Sp1 RPC:
Log on to the Exchange 2010 SP1 CAS server and open the registry and Navigate to the following:
HKEY_LOCAL_Machine\System\CurrentControlSet\Services\MSExchangeRPC.
Right-Click MSExchangeRPC, Select New Key. Type the name as ParameterSystem.
Select Parametersystem, and on the right-hand side, create a REG_DWORD named TCP/IP Port and put 50000 as Decimal Value.
Exchange 2010 SP1 Address Book Service:
Log on to the Exchange 2010 SP1 CAS server and open the registry and Navigate to the following:
HKEY_LOCAL_Machine\System\CurrentControlSet\Services\MSExchangeAB
Right-Click MSExchangeAB, Select New Key. Type the name as Parameters.
Select Parameters, and on the right-hand side, create a new String REG_SZ named  RpcTcpPort and put 55001 as Decimal Value.

Duplicate backup job fails with the error “Unable to determine ADAMM media identification. Catalog query failed” - Solution

Duplicate backup job fails with the error
“Unable to determine ADAMM media identification. Catalog query failed”
In job completion status, you see the following error:
 “The requested source duplicate backup sets catalog record could not be found. Perhaps the media containing the source backup sets was previously deleted”.

This error might occur if the corresponding catalog information of the source media is either missing or deleted
First thing is to determine the source media. DoubleClick the failed duplicate job, go to job log.
Expand the destination drive and media information
And check the media label.
Mostly it will be similar to OST000005458-423232994444AB. Make a note of it.
Now go back to backup exec console, go to Devices tab and run inventory.
After inventory is run, now on the right-hand side, select the specific Media label which you made a note of it and right-click and select “catalog Media..” on that media Label.
After it is finished, you can rerun the failed deduplicated job. Right-click the failed job and Select the “retry job now”.

Symantec Backup jobs may fail after the installation of R3

Symantec Backup fails after the installation of R3 with the error “The Logon account that was provided does not have valid credentials. Ensure that the user name and password are correct, and then try again” Error code 0xe0009b61.


First verify the user credentials by going to the selection lists. To verify the credentials,
Open Symantec backup exec and go to Job Setup Tab
In the list of backup selection lists, select the backup selection list which has failed and select the properties.
It provides the list of jobs used by the “selection list”. Click on Yes and continue.
Select the “Resource Credentials” in the left hand pane and then select “Test all” in the right hand side.

You might see an error “backup exec cannot establish a trust relationship with the remote agent because an SSL connection cannot be setup”
If you see the above error on any servers, then follow the procedure:
Logon to the server which has the above error and open the “Backup exec 2010 remote agent Utility”
Now select the publishing tab and check if “Enable the remote agent to publish information to the media servers in the list” is checked.  If yes, click on Change settings.
Now again the publishing tab window gets opened. If it is not opened, check on the system tray and click on backup agent and go to publishing tab. (You will have the option to remove all the servers listed)
Remove all the servers listed.
Now add the FQDN of the backup server and click on ok.
Perform the above procedure on all the servers.
Check again resource credentials to make sure that Symantec backup exec can connect to all the servers and run the backup job again.

Monday, October 10, 2011

Symantec backup exec 2010 R2/R3 - How to restrict the backup job to run on specific media server

If you have more than one media server, then there is a chance that the central admin server may delegate the backup job to run on other Media servers.
So to restrict the backup job to a specific Media server, open the Symantec backup Exec console on the server where the backup selection list is located.
Go to job setup and select the backup selection list which you would like to restrict.
Right-click and go to properties
Click on Yes, on In Use warning Window.
In the left-hand side, select the ‘Device’ under Destination tab.
In the right-hand side, enable the checkbox “Restrict backup of the selection lists to devices on the following media server or media servers”.
In the scroll button, select the backup server on which you want to restrict the backup to run.
By doing the above said, the job runs only on media server specified.

Symantec - Replication of Deduplication volume

How to set up the replication of Deduplication volume/folder in the remote location

Maintaining a copy of deduplication folder is nothing but creating a respective duplicate template on backup policies and ensuring that the copy of the backup is done to remote location dedup folder. It doesn’t completely replicate the dedup folder.
It just replicates the backup of the different backup jobs. I know it’s confusing; just follow the procedure as specified and it will be much clearer.

Note: The Destination device for the duplicate jobs must be the same type of the device and from the same vendor as the source backup.
Consider that we have two servers: backup01 and backup02.

Servers     Backup01 – current location           Backup02 – Remote Location
Name of the Dedup folder: Deduplication01                      Deduplication02
I am not explaining how to create Dedup folders. If you would like to know how to create Dedup Folder, Please follow the link below:
Steps:
First you need to install the central admin Server option (CASO) on the First backup Server (Backup01)

Once it is installed, the server is configured as a central admin server and the other server will be a managed media server.
Now create a duplicate template on backup policy.
1.       Select the job setup tab.
2.       Right click and select the properties of  the backup job you would like to copy to the remote dedup folder


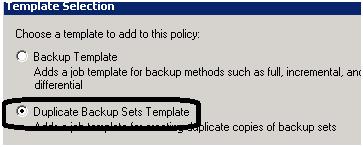
Now select the duplicate Template

Now it will list all the job templates. Select the check box on  the job you want to duplicate.
In the Device and Media tab,
Device : Select the managed media server dedup folder.(remote Dedup folder)
And In general tab, select the Preferred Source Device as the first dedup folder (i.e current location dedup folder)
And in the schedule, Select Run only according to rules for this template.
Once the actual job is run on the first dedup folder, immediately duplicate job runs and it copies the data of that job to the replicated dedup folder.

I appreciate any feedback.